Menu scripts
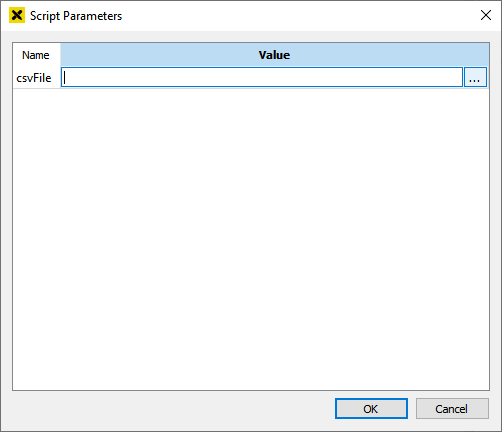
Script Parameters dialog
In this dialog the parameter values of the menu script can be changed. The initial value is the default value that you supplied in the script editor. Following data types are supported: boolean, number, string, filecontent and textfilecontent. Parameters with other types will be ignored by the dialog. If no parameter is defined, the script will be called directly without showing the parameter dialog.
For a parameter of the type "filecontent" or "textfilecontent" you can select a file in the dialog. The content of the file (not the name!) will then be passed to the script. Use "filecontent" for binary and "textfilecontent" for text files.
If the scripts contains a parameter "nodes" of the type "array" the nodes selected in the tree will be passed to the script as an array of NodeIds (e.g. ["ns=1;s=AGENT.OBJECTS.var1"]).
To pass back data from the script to the atvise builder, you can add a parameter of type "stream" with the name "output". In the script you can then write data with output.write("something"). When the script finishes, the previously written data is sent back to the atvise builder and a dialog is opened to write the data to a file.
The "uainput" type is only internally used by the atvise builder.
Create Views
Views are special nodes that organize other nodes to find nodes specified on some selection criteria. A criterion can be e.g: 'find all nodes in the OBJECTS folder that have an Alarm Configuration'. Views are static. They do not reflect the actual state of address space corresponding to the search criterion but a snapshot of the address space at certain time stamp.
The menu script CreateViews is used to create views that organize nodes of given node types. E.g: alarms, scripts and mirrors. The selected node(s) in the builder are the starting point(s) of the search for these nodes. If the selected node in the builder is a view then the all nodes in the Folder 'OBJECTS' and 'Object Types' will be searched. Otherwise the created view reflects only the selected nodes.

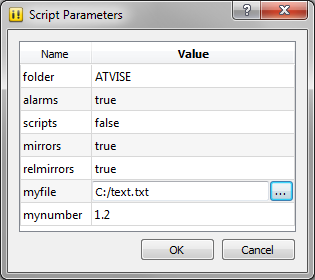
If the menu script CreateViews is called by the builder, then the input parameters may be set in a dialog before calling the script. The input dialog reflects the parameters of the script.
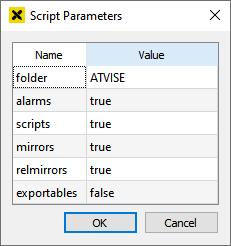
The input parameters of the menu script "CreateViews" are:
folder (String) – Specifies the name of the folder under Views, where the result will be stored. If folder is empty, then the result will be stored under Views.
alarms (Boolean) – Specifies if the view of alarms shall be reconstructed. The constructed view has a Declaration-Instance View structure.
scripts (Boolean) – Specifies if the view of scripts shall be reconstructed. The constructed view has a Declaration-Instance View structure.
mirrors (Boolean) – Specifies if the view of mirrors shall be reconstructed. The constructed view has a Good-Bad-Uncertain View structure for the MirrorInput/Output types and a Declaration-Instance View structure for MirrorDisable types.
relmirrors (Boolean) – Specifies if the view of relative mirrors shall be reconstructed. The constructed view has a Declaration-Instance View structure for the different relative mirror types: bases, path fragments, etc.
exportables (Boolean) – Specifies if the view referencing all nodes of the specified type shall be created. The view has the name 'All Exportables' and is embedded in the corresponding view of the specified type. As this view has direct references to the specified nodes, the nodes can be easily selected and exported.
Declaration-Instance View
The Declaration-Instance View groups the found nodes into a Declaration-Instance structure.
The Declarations part consists of nodes with the specified type. The found nodes are stored in a sub-view that is named after the node with some name mangling ('.' is replaced by '_'). This make easier to identify the found node. The View contains a reference to the found node and sub-view named 'Instances'. The 'Instances' sub-view organizes all nodes referencing the found node in the 'OBJECTS' folder.
The Instances part consists of nodes that are referencing the found nodes from the 'OBJECTS' Folder.
Good-Bad-Uncertain View
The Good-Bad-Uncertain View consist of the sub-views 'Good', 'Bad' and 'Uncertain'. Each of these sub-views lists the parent nodes of the specified node type in the corresponding status view depending on the status of the parent node.
CSVExport
This menu script in atvise enables exporting either a part of the address space or the whole address space to a CSV file.
Select the node which shall be exported. Right-click OBJECTS if the whole address space shall be exported.
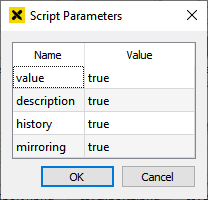
Choose .

In the appearing dialog select which node properties shall be exported (value, description, history, mirroring). For the selected properties, header fields will be added to the CSV file.
If the script detects an error, it will abort the operation and print the error message in the atserver log.
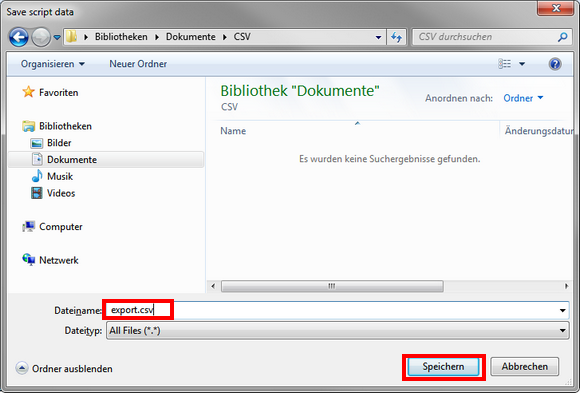
If a file selection dialog appears, that means the script was successfully executed.
Enter a filename for the file in which the information will be stored.
CSVImport
This menu script in atvise enables importing of nodes from CSV files.
A CSV import file with the header fields listed below is needed. The order of the header fields as well as the amount of header fields are arbitrary and have to be specified within the first line of the CSV file.
Mandatory fields:
<NodeName> – Node name in format FOLDER1.FOLDER2.nodeName, all specified folders will be automatically created under "AGENT.OBJECTS"
<DataType> – Format: object, folder, boolean, int16, uint16, int32, uint32, int64, uint64, float, double, string, datetime, byte, sbyte
Optional fields:
<NodeValue> – Numeric or string value for a variable
<Description> – Node description
<TypeDefinition> – Object type (e.g.: "MyType" or "ObjectTypes.PROJECT.MyType") or variable type (e.g. "MyVarType" or "VariableTypes.PROJECT.MyVarType")
Hint
The parts "ObjectTypes.PROJECT" or "VariableTypes.PROJECT" can be omitted, and the correct type will still be used.
<HistoryGroups> – Specifies one or more history groups in the following format: {group1, group2, group3}
<MirrorInput> – Specifies the mirror input address of the node. e.g. "s7/ns=1;s=OFFICE.ALARMS.alarm01"
<MirrorOutput> – Specifies the mirror output address of the node. e.g. "s7/ns=1;s=OFFICE.ALARMS.alarm01"
<MirrorInputOutput> – Specifies the mirror input/output address of the node. e.g. "s7/ns=1;s=OFFICE.ALARMS.alarm01"
<RelMirrorBase> – Specifies the base part of the mirror address. e.g. "s7/ns=1;s=OFFICE.ALARMS"
<RelMirrorInput> – Specifies the path fragment of the mirror input address relative to <RelMirrorBase>. e.g. {2:Lights, 2:Room01}
<RelMirrorOutput> – Specifies the path fragment of the mirror output address relative to <RelMirrorBase>. e.g. {2:Lights, 2:Room01}
<RelMirrorInputOutput> – Specifies the path fragment of the mirror input/output address relative to <RelMirrorBase>. e.g. {2:Lights, 2:Room01}
<OnDemand> – Determines if "On Demand" feature will be used (true/false). This field requires a <MirrorInput>, <RelMirrorInput>, <MirrorInputOutput> or <RelMirrorInputOutput>.
Start the script by right-clicking on your OBJECTS folder and choosing .
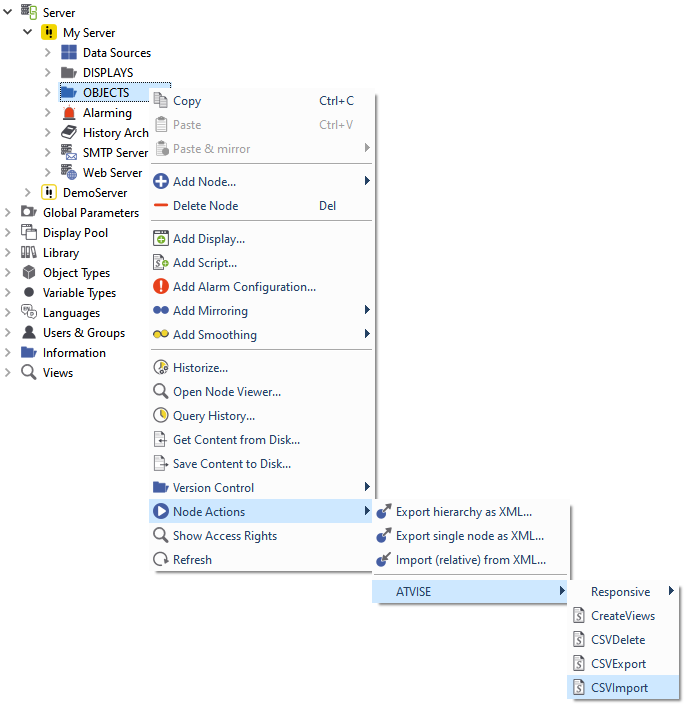
Choose the CSV input file in the appearing dialog.

The script reads the given CSV file line by line - it will create folders/variables/objects OR update existing folders/variables/object if they already exist.
If the script reaches an error, it will abort the operation, and print an error message in the atserver log and in a dialog box.
Wait until the dialog box "Script finished successfully" appears - atvise builder and project console cannot be used while the import is running!
Refresh your OBJECTS tree by right-clicking it once.
Example:
<NodeName>;<DataType>;<TypeDefinition>;<NodeValue>;<Description>;<HistoryGroups>;<MirrorInput>;<MirrorOutput>;<MirrorInputOutput>;<RelMirrorBase>;<RelMirrorInput>;<RelMirrorOutput>;<RelMirrorInputOutput>;<OnDemand>
int16;int16;;1;16 bit integer;;;;;;;;;
string;string;;atvise scada;string;;;;;;;;;
history;int32;;0;history;{datavalues};;;;;;;;
mirrorAbsolute;uint32;;0;mirrorAbsolute;;"s7/ns=5;s=RemoteVariable";;;;;;;
mirrorRelative;int16;;0;mirrorRelative;;;;;;"{1:test1,1:test2}";;;
ondemand;int16;;0;ondemand;;"s7/ns=5;s=remote.node";;;;;;;true
object;object;ObjectTypes.PROJECT.MyObjectType;;object;;;;;;;;;
variableType;int16;VariableTypes.PROJECT.MyVariableType;0;variableType;;;;;;;;;
CSVDelete
This menu script in atvise enables deletion of nodes within the atvise address space. To delete nodes, a CSV file is needed with only one required field: <NodeName>. All other fields are ignored, so therefore it is possible to use previously set-up import files or export files.
Start the script by right-clicking on your OBJECTS folder and choosing .

Select the CSV input file in the appearing dialog.
The script reads the given CSV file line by line - it will delete folders/variables/objects
Wait until the dialog box "Script finished successfully" appears - atvise builder and project console cannot be used while the import is running.
Refresh your OBJECTS tree by right-clicking it once.
The script will print out a short summary of successfully deleted nodes in the server log.
