Server and project console
Overview
The Project Console is the central place for all project-related activities. With the Project Console you can:
Add projects
Remove projects
Change project/server settings
Monitor the atvise server service
The Project Console is split into two parts. One for activities related to the atvise server service and one for advanced tasks like starting an additional project in console mode.
Service Tab
On the "Service" tab you can control and monitor the project that is started by the atvise server service.
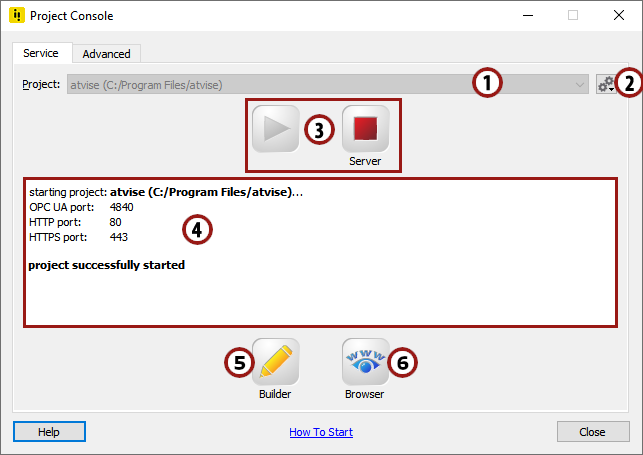
Enables you to change the current project.
Opens a menu that allows you to add and remove projects and change the settings of the current project (see below for details).
Lets you start and stop the atvise server.
Shows the most important information from the log file while starting or stopping the server.
Starts the atvise builder.
Shows the visualization in the default browser.
Menu
The menu (to the right of the selected project) offers you the following options:
- Add Project
Allows you to add a new or existing project to the list. See below for details.
- Copy Project
Creates a copy of the selected projects and adds it to the list. See below for details.
- Remove Project
Removes the project from the list. Does not remove the project from the file system!
- Show Server Log
Shows the log file of the project.
- Settings
Lets the user change the settings of the project. See below for details.
Add Project
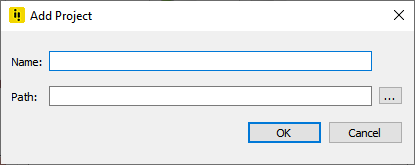
Input the name of the project and input or select the directory of the project. When you select a directory and the name field is empty, the last part of the directory will be used as the name automatically.
Copy Project
Similar to "Add Project", but in addition to creating a new project, the nodes.db of the current project is copied to the project directory.
In order for the Copy Project to succeed, the nodes.db of the current project may not be in use and the target directory may not already contain a nodes.db.
Settings
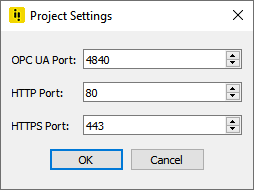
If the atvise server doesn't start up because a port is in use, you can change the OPC UA port, HTTP port and HTTPS port here.
Hint
When setting http/https port value to 0, it is disabled.
Advanced Tab
On the "Advanced" tab you can manage the list of projects and start projects other than the default project.
The first project in the list is always the project in the atvise installation directory. This project always exists and cannot be deleted. The other projects in the list are fully editable by the user. The current project (the project that is started by the atvise server service) is written in bold characters. To change the current project, switch to the "Service" Tab and select the project.
Hint
A project in atvise is a directory which contains all project-related files. Most notably these are nodes.db, the log file and the database directory (historical data). The atvise server automatically creates nodes.db at startup if it does not already exist in the project directory.
Context menu
The context menu offers you the same functionality as the context menu in the Service tab and adds the following additional function:
- Start In Console Mode
Starts the project in console mode. See below for details.
Start In Console Mode
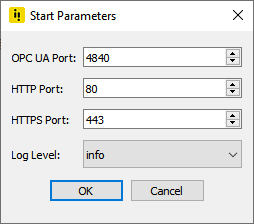
Allows you to start the currently-selected project in console mode. In the dialog that pops up, you can change the ports to be used and the log level of the server. The settings are only used as startup parameters for this session and are not stored for subsequent calls.
The console mode can be used to start more than one project at the same time or for advanced diagnostics (different log level, credentials of the currently logged in user, …).