Mirroring
Mirroring of alarms makes it possible to visualize and operate alarms of an OPC UA data source.
The data sources with mirrored alarms can be found in the project tree below Servers ‣ My Server ‣ Alarming ‣ Mirroring ‣ Sources:
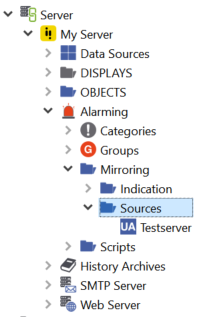
Data sources with alarm mirroring
Alarm mirroring works with your existing data sources. To utilize alarm mirroring you first have to create an OPC UA data source.
To add alarm mirroring to an existing datasource, right-click Servers ‣ My Server ‣ Alarming ‣ Mirroring ‣ Sources, select and pick the desired data source. Double-click the data source to configure alarm mirroring.
Hint
To be able to complete the configuration, ensure that the data source is connected.
The first buttons at the top have the same meaning for each tab:
|
Select the data source in the project tree |
|
Save changes |
|
Reload |

General
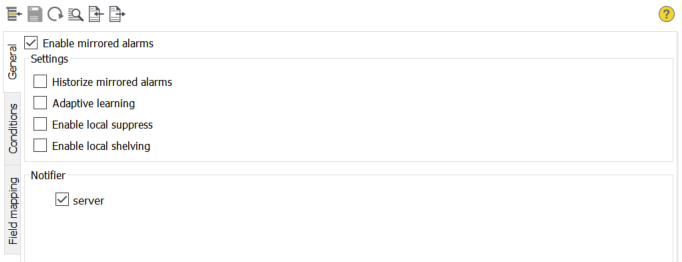
- Enable mirrored alarms
Globally enable or disable mirrored alarms for this data source.
Hint
The maximum number of alarms, that can be received from the data source at the same time, depends on the respective data source. If this limit is exceeded by simultaneously pending alarms, the exceeding alarms are transmitted at the next status change. This limit also applies to the maximum number of conditions, that can be adapted at once (see adaptive learning below).
- Historize mirrored alarms
If activated, mirrored alarms are historized locally. You have to create an event archive group for events to be historized.
- Adaptive learning
If activated, all conditions received from the data source are automatically added to the list of conditions.
- Enable local suppress
If activated, alarms of this data source can be suppressed locally.
Attention
Shall not be activated if the data source also suppresses alarms. Using suppress functionality in both the data source and atvise will lead to undefined behavior.
- Enable local shelving
If activated, alarms of this data source can be shelved locally.
Attention
Shall not be activated if the data source also shelves alarms. Using shelve functionality in both the data source and atvise will lead to undefined behavior.
- Notifier
As alarms are delivered as OPC UA events, you have to specify the notifier(s) that should be used for this purpose. The server notifier is always available and is able to deliver all alarms of the data source. A data source may have an arbitrary big hierarchy of notifiers. You can browse the notifier hierarchy by clicking the
 button. Then select the notifier(s) to use by activating the corresponding checkbox. You can also export the notifiers to a CSV file with the
  button and import them from a CSV file with the
  button.
Conditions
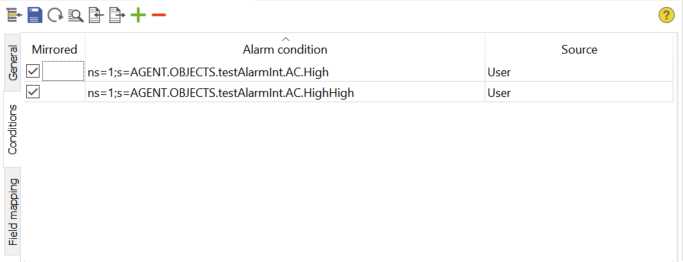
This tab contains the list of known conditions, whether they are used to mirror alarms and where they come from. The conditions are persisted in the project database and therefore still available after a restart of the atvise server. Conditions can be added to the list in following ways:
Automatically by using adaptive learning
By clicking on the
button to browse conditions in the data sourceBy clicking on the
button to import conditions from a CSV file
Hint
Adding conditions by browsing will only work if the data source is atvise version 3.3 or higher or the data source exposes conditions in the address space. For all other cases enable adaptive learning or add conditions manually.
Conditions will never be automatically deleted from the list. To delete conditions, select them and click the ![]() button.
button.
You can also export the conditions to a CSV file with the ![]() button.
button.
- Mirrored
If activated, alarms of this condition will be mirrored.
- Alarm condition
The nodeId of the condition.
- Source
The source of the condition. This can be one of the following:
Browse – Added through browsing the data source
User – Manually added from the user
Import – Added through import from a CSV file
Remote – Added through adaptive learning
Deleted from data source – The condition no longer exists in the data source
Field mapping
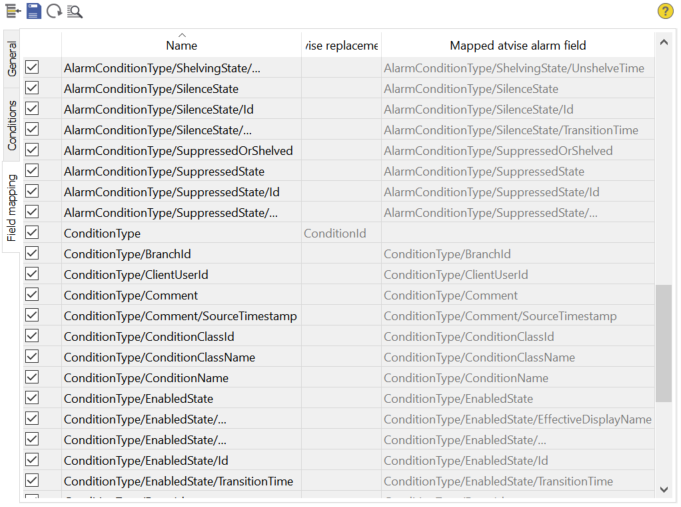
This tab is used to map alarm fields of the data source to alarm fields (including replacements) of atvise.
By default, the standard OPC UA alarm fields used by atvise are always mapped. To map additional fields (if any), click on the ![]() button. If the data source is an atvise server, additional atvise alarm fields will automatically be mapped. All automatically mapped fields are greyed out and cannot be changed. You can map the other fields by activating the checkbox to the left of the desired field. You can also change the name of the replacement or select an unmapped atvise alarm field to complete the mapping.
button. If the data source is an atvise server, additional atvise alarm fields will automatically be mapped. All automatically mapped fields are greyed out and cannot be changed. You can map the other fields by activating the checkbox to the left of the desired field. You can also change the name of the replacement or select an unmapped atvise alarm field to complete the mapping.
- Name
Name of the alarm field in the data source.
- atvise replacement
The name of the replacement field, if you want to map the alarm field of the data source but no corresponding atvise alarm field is available. The field will only be mapped if the alarm field exists in an alarm of the data source and is not null. Double-click the entry for editing.
- Mapped atvise alarm field
The name of the atvise alarm field, if you directly want to map the alarm field of the data source to the corresponding atvise alarm field. Double-click the entry for editing, click the
 button to the right of the input field to select an atvise alarm field.
Colors and flash intervals
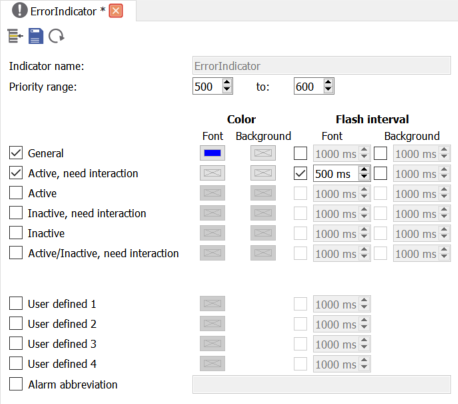
Colors and flash intervals for mirrored alarms are defined with indicators. Indicators are very similiar to Alarm categories but as the acknowledgement type is controlled by the data source, only settings regarding the visual representation of an alarm are available.
To add an indicator, right-click Servers ‣ My Server ‣ Alarming ‣ Mirroring ‣ Indication and select . Double-click the indicator to edit it.
The most important setting of an indicator is the priority range. When the priority of a mirrored alarm is within the range of an indicator, the settings of the indicator are used to specify the colors and flash intervals for the alarm. Overlapping ranges are not allowed and the atvise builder will issue an error message if you want to save such an indicator.
The priority range of a new indicator is always 0 to 0 and you can reset the range to 0 to 0 to always be able to save the indicator. As the priority of an alarm can only be in the range 1 to 1000, an indicator with a range of 0 to 0 will never be used. If the priority of an alarm is not within the range of any of the indicators, the global defaults for colors and flash intervals will be used.
Hint
If you change the range of an indicator directly (XML import, server side script, …) in a way that you get overlapping ranges, it is undefined which indicator will be used if the priority is within multiple ranges.
The settings for color and flash interval are identical to the settings of an alarm category.