Configuration
In the atvise builder you have the opportunity to add alarms to your data structure. An alarm is triggered when the value of the corresponding data variable meets the configured condition (e.g. limit).
For an overview of how alarms are signalized and handled in the visualization go to the atvise webMI visualization section.
For a detailed description of the alarm list go to the Alarm list section.
Alarm categories
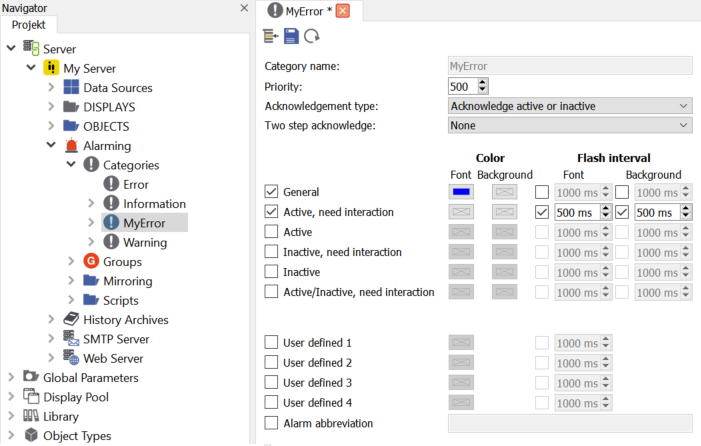
Alarm categories contain common alarm properties like priority, acknowledgment type and others. They are used when configuring alarm conditions. atvise SCADA comes with following predefined alarm categories:
Information
Warning
Error
Alarm categories
To add your own alarm categories, right-click Servers ‣ My Server ‣ Alarming ‣ Categories and choose .
The mandatory properties of an alarm category are:
- Category name
The name of the alarm category
- Priority
The priority of the alarms using the category
- Acknowledgement type
Specifies the acknowledgement type of the alarms using the category:
not acknowledgeable – An alarm will never be in the unacknowledged state and can therefore not be acknowledged by the user
acknowledged by inactive – An alarm is automatically acknowledged when it becomes inactive
inactive by acknowledge – An alarm will automatically become inactive when it is acknowledged
acknowledge active or inactive – Either the active or the inactive state of an alarm must be acknowledged
acknowledge active and inactive – Both the active and the inactive state of an alarm must be acknowledged
- Two step acknowledge
Specifies if alarms have to be confirmed after acknowledment, possible only for the acknowledgement types acknowledge active or inactive and acknowledge active and inactive
The following block of properties is optional and can used to define colors and blink rates for the category. A more specific setting has precedence over the General settings:
- General
The settings to use for any alarm. If not activated, global defaults will be used.
- Active, need interaction
The settings to use for active alarms that needs acknowledgement or confirmation.
- Active
The settings to use for active alarms where no acknowledgement or confirmation is required.
- Inactive, need interaction
The settings to use for inactive alarms that needs acknowledgement or confirmation.
- Inactive
The settings to use for an inactive alarm where no acknowledgement or confirmation is required.
- Active/inactive, need interaction
The settings to use for an alarm of acknowledgement type acknowledge active and inactive, that is in state "active unacknowledged and inactive unacknowledged".
Hint
The precedence rules allow you to define e.g. a specific blink rate for some type of alarm while still defining a color to be used for all alarms. In the screenshot above, the category defines a blue font color for all alarms and a blink rate of 500 milliseconds for active alarms needing acknowledgement or confirmation.
The last block of properties ("User defined 1" to "Alarm abbreviation") is also optional, but usage of the settings is completely up to the user. The settings are not used by the provided alarm list.
All properties of an alarm category will be sent to the client as a name/value pair as additional alarm information.
Prevention and modification scripts
Prevention and modification scripts can optionally be added to any alarm condition to prevent an alarm from being triggered and to modify an alarm before it is distributed in the system. Both types of scripts can be created by right-clicking on Servers ‣ My Server ‣ Alarming ‣ Scripts and choosing or . The scripts can be distinguished by their icon in the project tree:
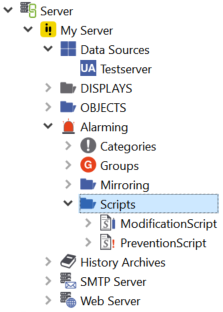
Both scripts have a parameter with the name alarm which is a JavaScript object containing the alarm fields as properties. See Alarm object properties for a description of the alarm fields.
Attention
Try to keep the run-time of the scripts as short as possible, as they affect the time the alarm will be triggered!
While the prevention script of the alarm of an alarm condition is running, changes of the alarm state are ignored, even if the value of the corresponding data variable is changing in a way that the alarm would normally become inactive and active again multiple times.
A prevention script can be used to prevent an alarm from being triggered. You can examine the alarm fields, read the values of OPC UA variables and call any other script function in the prevention script to determine if the alarm should be triggered or not. To prevent the alarm from being triggered, return true from the script. In this case the alarm is internally marked as prevented. As long as this marker ist present, a prevention script will not be triggered again. The marker will be removed when the value of the corresponding data variable no longer meets the configured condition.
A modification script can be used to modify an alarm before it is distributed in the system. You can change existing alarm fields and add new fields that work the same as the additional alarm information described below. To change or add fields, return a JavaScript object with the field names as property names and the new values as values of the properties:
return { display: "AGENT.DISPLAYS.MAIN.MyDisplay", MyNewProperty: true };
Danger
Be careful when changing a standard alarm field as this may seriously affect the correct handling of an alarm!
Alarm configuration
To add an alarm configuration, right-click on the desired node and choose from the list which appears:
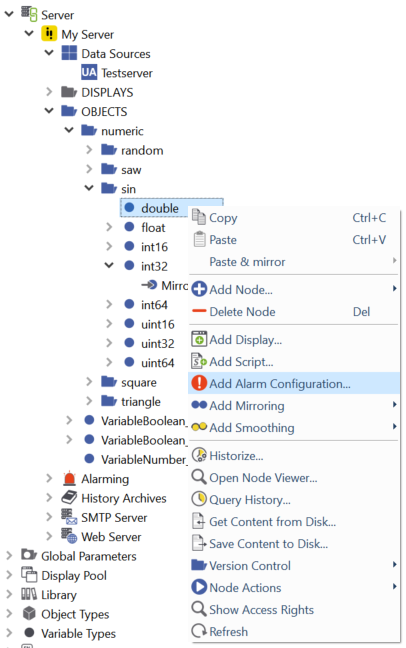
Adding an alarm configuration
Double-click the alarm configuration to configure the alarm:
When the alarm configuration is opened, all conditions are collapsed for a better overview over the configuration of the alarm. To expand a condition click on the ![]() button.
button.
The buttons at the top have following meaning:
|
Select the alarm configuration in the project tree |
|
Save changes |
|
Reload |
|
Add condition |

- Condition type
Discrete: Triggers an alarm if the source value and the condition value (don't) match.
Discrete retrigger: Like Discrete, but each source value change that fulfills the condition triggers a new alarm. A Discrete retrigger alarm has special behavior:
the acknowledgment type of the alarm category is ignored
an alarm is automatically removed from the alarm list as soon as it is acknowledged
if the condition is no longer fulfilled, current alarms will not become inactive
Limit: Triggers an alarm if the source value is in the given condition range.
- Source node
If the alarm configuration is defined under a variable, the source node will be automatically set to this variable. If the alarm configuration is defined at another place of the object structure, the source variable must be selected here.
- Display
Select the corresponding display for your alarm (necessary for the jump-to-display function of the visualization).
The common settings of a condition can be changed directly in the collapsed view. To access all settings expand the condition. A condition has following settings:
- Condition name
Each condition must have a distinct name in the alarm configuration.
- Category
Specifies the category of the condition: warning, error, etc.
- From/To range, Value
Specifies the limit or match value of the condition with the corresponding operator. The limit (or match value) can be a value of the same type as the source node, a nodeId of a variable where the value is to take from or a browse path relative to the alarm configuration pointing to a variable where the value is to take from.
- To active text
Specifies the text to be displayed if the condition state changes to active (this text will automatically be considered for the translation; no "T{}" required).
- To inactive text
Specifies the text to be displayed if the condition state changes to inactive (this text will automatically be considered for the translation; no "T{}" required).
- Max. timeshelve
The maximum time period an alarm can be shelved. If not set, the system-wide default defined in atserver.ini will be used.
- Delay on
The time period an alarm will stay inactive even if the condition is already true.
- Delay off
The time period an alarm will stay active even if the condition is no longer true.
- Prevention script
Specifies the script to be run before an alarm becomes active. See Prevention and modification scripts for details.
- Modification script
Specifies the script to be run before the alarm is distributed in the system. See Prevention and modification scripts for details.
- Explicit acknowledge
If activated, an alarm must always be acknowledged explicitely and will not be acknowledged if it as part of a sum alarm that is just being acknowledged.
Examples for configurations:
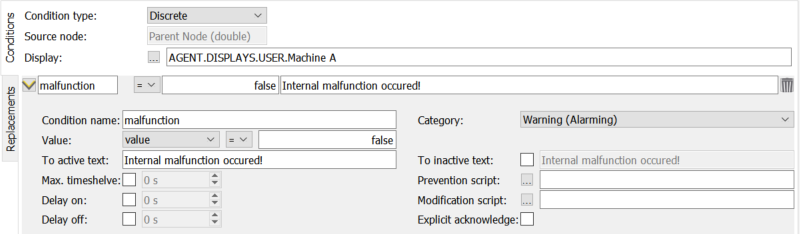
Alarm configuration for a discrete variable

Alarm configuration for an integer variable
The additional alarm information (also called replacements) will be sent as a name/value pair to the client. It must start with a capital letter. The value part is taken from the node that is defined in the browse path (it is like a pointer). Additional alarm information makes sense for alarm configurations defined at object types as shown in the following figure:

Alarm configuration example of additional information
The buttons ![]() and
and ![]() at the top are used to add and delete rows of the table.
at the top are used to add and delete rows of the table.
Hint
You have to configure the global parameters of the alarm list to show additional alarm information. Add an entry for each additional alarm information and define at least the columns columnName, field (must match the name of the additional alarm information, e.g. "Info" in the picture above), orderDetail, type and visibleDetail.
Hint
The atvise alarm log and history table substitute additional alarm information automatically; for this purpose you can use the printf syntax, e.g.: To active text: HighHigh: %(Info)s