Timer
Hint
The Timer can not be used with atvise webMI.
Located in atvise builder you will find within the project tree as well as in the library below the drawing area the folder "atvise". Here, the appropriate sub-folder "timer" contains the relevant object display.
The timer display embraces a "Scheduler List" with filter options and a button "Add new/edit event" to add or edit events at the "Scheduler List".
The "Scheduler List" displays all events which where configured using the "timer".
Configuration
- timer configuration node
Default = "AGENT.OBJECTS.TimerConfig": includes the timer configuration (added events), see also access control - visualization rights.
- timer id
This is the unique id for each "timer" object display. Moreover it is necessary if you use more than one "timer" object display. Otherwise you will see all added events at the second "timer" object display too.
- Variable start address
Default = "AGENT.OBJECTS". Location from where the existing nodes can be chosen in the timer.
- Timer step interval
Default = "5" (min). Interval to choose start time of events.
Security
- necessary right
The right which is necessary to use the "timer" object display in the visualization.
- activation address
if the value of this address equals to "activiation value", then the timer will be active and can be used.
- activation value
Value which activates the control.
Scheduler list

Schedule List Filter options
- Start from
Date to filter all events with a first occurrence that is later then the selected start date.
- Start to
Date to filter all events with a first occurrence that is earlier then the selected start date.
- End from
Date to filter all events with a last occurrence that is later then the selected end date.
- End to
Date to filter all events with a last occurrence that is earlier then the selected end date.
- Address
Used to filter a specific address.
- Status
Filter all events according to the selected status.
- Button "Apply"
Button that activates the selected filter options.
- Button "Reset"
Button to reset the filter options.
Schedule List colums
- #
Unique IDs of events in the "Scheduler List".
- Recurring
Show the Recurring of an event (daily, weekly, monthly & yearly).
- First occ.
Date of the first occurrence of an event.
- Last occ.
Date of the last occurrence of an event.
- Start time
Start time of an event.
- Duration (min)
Duration of an event in minutes.
- Description
Description of an event.
- Node
Selected node which changes its value at the start and end of an event.
- Value on
Value on which the node will be set at the start of an event.
- Value off
Value on which the node will be set at the end of an event.
- Status
Shows the state of an event (active if the event runs again, inactive if the event has finished)
- Action
The possibility to edit an event.
- Button "Add new / edit" events
Button to add or edit an event in the Scheduler List. If you push the button a calender, called "Timer Scheduler" will open at the display.
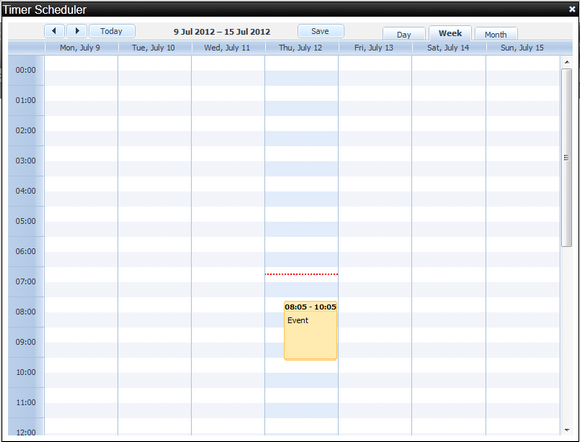
Timer Scheduler
The "Timer Scheduler" is a calender which represents a daily/weekly/monthly view and also shows all created events. You are able to create a new event by clicking and dropping down at a day in the "Timer Scheduler". The current day and time will also be marked in the "Timer Scheduler".
If you use different timer IDs the "Timer Scheduler" only shows the events from the corresponding "timer".
Description of the buttons
- Today
Button to skip to the current day.
- Arrow left/right
Button to switch from day/week/month to the next day/week/month or to the last day/week/month.
- Save
Button to save the created/edited events. (First you have to add and save an event and then save the Timer Scheduler with this button)
- Day
Button to show the calender in the daily view.
- Week
Button to show the calender in the weekly view.
- Month
Button to show the calender in the monthly view.
Add a new event
Add a new event by clicking on a date in the "Timer Scheduler".
Another dialog will be opened in which all relevant settings can be configured.
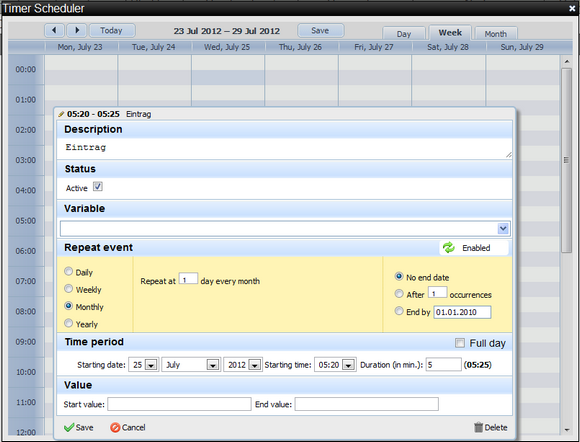
Description of the settings for an event
- Description
A Text which describes the event. This text will also be displayed in the calendar at the corresponding event.
- Status
The state for the event. If you select the checkbox "Active" the event will be activated otherwise the event will be deactivated.
- Variable
The address on which the start value and end value will be written. Only the variables from the "Variable start address" will be shown in the dropdown list in the section "Variable".
- Repeat event
It is possible to repeat an event with following options:
daily
Every day: The event is triggered every day.
Every workday: The event is triggered every workday (Mo, Tue,We, Thu, Fr).
weekly
Repeat every week at following day [Mo, Tue,..] : The event is triggered every week at the selected day.
monthly
Repeat [1,2,3,. ] day every month: The event is triggered every month at the [first, second, third,.. ] day of the month.
yearly
Every [1,2,3,..] day at month [January, February,..]: The event is triggered every [first, second, third,..] day at the selected month.
Settings to complete an event
No end date: The event has still not finished.
After [1,2,3,..] occurrences : The event ends after the selected number of occurrences.
End by [01.01.2012] : The event ends at a defined date.
- Time period
Starting date: The starting date of the event.
Starting time: The starting time of the event.
Duration (in min): The duration in minutes of the event.
Full day: With this option the event runs the whole day.
- Value
Start Value: The value which will be written on the selected variable at "Starting date & Starting time".
End Value: The value which will be written on the selected variable at the end of the chosen duration.
- Button "Enabled/Disabled"
Button to enable/disable the "Repeat event" index for an event.
- Button "Save"
Button to save the event to the calendar.
- Button "Cancel"
Button to cancel the event without saving the event to the calendar.
- Button "Delete"
Button to delete the event from the calendar.
Attention
The event is stored or deleted at the calendar but not at the Scheduler List. Therefore click also the "Save" button at the Timer Scheduler.