Configuration
For compatibility reasons, atvise accepts all certificates without any verification by default. Certificate verification must be explicitly enabled for each atvise application:
Trustworthiness
The autotrust option defines whether an atvise application automatically trusts any certificate or requires certificates to be explicitly trusted first.
Validity
The validate option allows to enable an additional validity check for trusted certificates. This includes verifying the validity period or the format of the certificate.
An OPC UA client also checks if the hostname (or DNS name or IP address) in the server certificate matches the address used for establishing the connection. For example, the URL "opc.tcp://test.atvise.at/" requires the entry "test.atvise.at" in the server certificate.
Command line parameters
Depending on the application, the following command line parameters are available for enabling and configuring the certificate handling:
--cert_autotrust=on|off – Enables or disables the certificate verification for the application. Note: Data sources have their own settings and are not affected by --cert_autotrust.
--cert_validate=on|off – Enables or disables the validity check for certificates. Note: Data sources have their own settings and are not affected by --cert_validate.
--cert_autotrustUsers=on|off – Enables or disables the user certificate verification for the application.
--cert_validateUsers=on|off – Enables or disables the validity check for user certificates.
--cert_store=dir – Allows to define another directory for storing all certificates and private keys instead of the application's default certificate store.
--cert_own=file – Defines the application's certificate. Only the filename without the path must be specified. A certificate in DER format is expected. The private key is automatically determined via base name of cert_own with the ".pem" extension.
--cert_create=name – Creates a new self-signed certificate with the given name. The name should also include the hostname.
Example:
/cert_create=myownname@hostname.der =>
myownname@hostname.derThe private key is automatically created with the same name. CAUTION: If a certificate with the given name already exists, it will be overwritten without any warning. User certificates cannot be created using this command.
--cert_ignoreIssuerTime=on|off – Allows to ignore the validity period of root and intermediate certificates as well as CRLs (Certificate Revocation Lists). This means, that the connection can be established even with expired CRLs or root and intermediate certificates, as long as the end certificate itself is valid.
atserver |
atbuilder |
opcuatestserver |
|
|---|---|---|---|
cert_autotrust |
Yes |
Yes |
Yes |
cert_validate |
Yes |
Yes |
Yes |
cert_autotrustUsers |
Yes |
No |
Yes |
cert_validateUsers |
Yes |
No |
Yes |
cert_store |
Yes |
No |
Yes |
cert_own |
Yes |
Yes |
Yes |
cert_create |
No |
No |
Yes |
Hint
The order of parameters must be followed so that, for example, a certificate created with --cert_create is stored in the correct certificate store (--cert_store).
The parameter prefix depends on the application: "/" (Windows) and "--" (Linux) for the atserver, "-" for the atbuilder and "--" for the opcuatestserver.
atvise server
The atvise server can be configured via the atserver.ini file.
atserver.ini:
[certificates]
autotrust=false
validate=true
Settings for OPC UA server and endpoints in atvise versions < 3.11 were configured in the ServerConfig.ini file. This file is no longer supported. Therefore, the settings must be transferred to the atserver.ini file:
ServerConfig.ini (alt) |
atserver.ini (neu) |
|---|---|
[certificates] |
|
DefaultApplicationCertificateStore/OpenSSLStore/…
DefaultApplicationCertificateStore/ServerCertificate_x/…
UserIdentityTokens/DefaultUserCertificateStore/…
UaEndpoint_x/CertificateStore/OpenSSLStore
|
store |
… OpenSSLStore/ServerCertificate
… OpenSSLStore/ServerPrivateKey
|
own |
UaEndpoint_x/AutomaticallyTrustAllClientCertificates |
autotrust |
UaEndpoint_x/SecurityCheckOverwrites/Disable… |
validate |
UaEndpoint_x/SecurityCheckOverrides/DisableErrorCertificateIssuerTimeInvalid |
ignoreIssuerTime |
[opcua] |
|
UaEndpoint_x/SecuritySetting_1/SecurityPolicy… |
disableSecurityPolicyNone |
UaEndpoint_x/SecuritySetting_2/MessageSecurityMode_1 |
disableMessageSecurityModeSign |
A detailed description of these configuration parameters can be found in the respective sections ([certificates] and [opcua]) in the chapter atserver.ini.
Hint
The atvise server uses the same certificate for all endpoints. Therefore, the DNS names (or hostnames) attribute must include all DNS names for the server applications (see X.509v3 format).
The following endpoints are available by default:
Endpoint 1 (Security Policy: None, Message Security Mode: None)
Endpoint 2 (Security Policy: Basic256Sha256, Message Security Mode: Sign)
Endpoint 3 (Security Policy: Basic256Sha256, Message Security Mode: Sign & Encrypt)
It is not possible to add additional endpoints via
atserver.inifile.
atvise builder
The atvise builder can be configured directly with the Validate and Autotrust checkboxes in the connection dialog:

Basic settings for self-signed certificates
Self-signed certificates in atvise are created on the basis of the cert.ini file (%PROGRAMDATA%\atvise (Windows) or /var/lib/atvise (Linux)). The information stored in this file must be specified during the atvise installation:
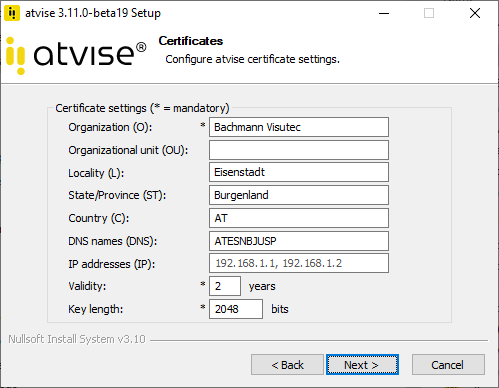
Organization (O) – Mandatory
Organizational unit (OU)
Locality (L)
State/Province (ST)
Country (C)
DNS names (DNS)
IP addresses (IP)
Validity – Mandatory, default: 2 years
Key length – Mandatory, possible values: 2048, 3072 or 4096 bits, default: 2048
Every atvise application uses the information from this file for creating self-signed certificates.