Scaling
Scaling technique
Since atvise 3.1.0, scaling of the visualization is done through CSS. This means, that when a display is loaded into an iframe, its foreignobjects are not directly resized, but through styleable attributes we reach a shrinked or enlarged representation of them. Also, when changing the size of the browser window, the visualization as a whole while be shrinked or enlarged visually through CSS instead of manipulating the size of the elements.
Check the following example:
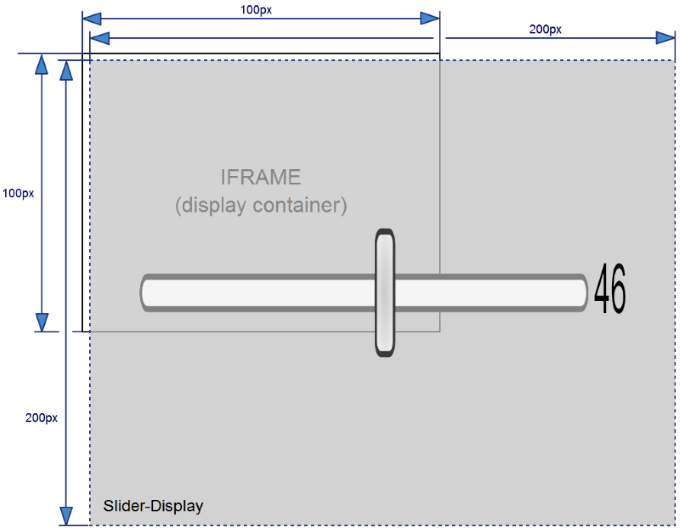
Original display
On a certain visualization page, there is an iframe that loads a so-called Slider-Display. But the Slider-Display is projected too big to be shown within that iframe.
To be able to show the Slider-Display within the iframe, it is scaled through CSS:
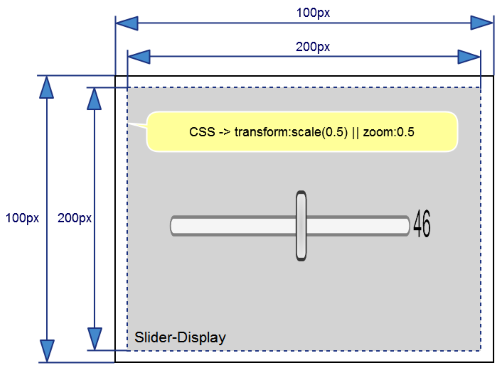
Display scaled through CSS
Now the display is shown shrinked, without any change in size to the display projected in the atvise builder.
By doing this, all elements that have no SVG origin (foreignobjects) can also be seamlessly scaled and a change of the screen resolution the visualization does not require an adjustment by the developer.
Configuration
Starting with atvise 3.1.0, CSS based scaling is used by default. However, its possible to switch to a compatibility mode in the Configuration.
What to take care about CSS based scaling
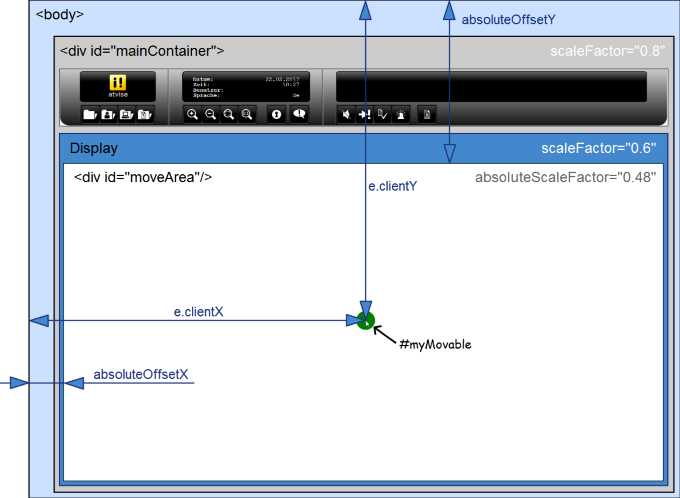
As described in Scaling technique above, the actual proportions of the displays and their elements are not changed. This could lead to incorrect event coordinates under certain circumstances. Also, positions in relation to the top left corner of the browser window can be calculated incorrectly by libraries like JQuery.
Hint
Only foreignobject elements are affected by these restrictions.
For that reason, the webMI library provides following helper methods to retrieve correct event coordinates and offsets:
getAbsoluteOffset
getAbsoluteScaleFactor
getBoundingClientRect
setScaledEvents
scaleEventCoordinates
All functions are described in Graphics functions and are used in large part in the following practical example.
Practical example
This example shall illustrate the usage of the previously mentioned methods. It is about projecting a display which shows a circle that follows the position of the mouse cursor.
Coordinate correction using scaleEventCoordinates
To make it possible that the circle follows the mouse position correctly in every possible scaling state of the visualization, we have to help ourselves with the "getAbsoluteOffset" and "scaleEventCoordinates" methods:
<?xml version='1.0' encoding='UTF-8' standalone='no'?>
<svg height="680" xmlns:atv="http://webmi.atvise.com/2007/svgext" xmlns="http://www.w3.org/2000/svg" width="1280" version="1.2" xmlns:xlink="http://www.w3.org/1999/xlink">
    <defs/>
        <metadata>
            <atv:gridconfig enabled="false" gridstyle="lines" height="20" width="20"/>
            <atv:snapconfig enabled="false" height="10" width="10"/>
        </metadata>
        <foreignObject height="680" y="0" x="0" width="1280" id="id_0">
            <div style="width:100%;height:100%" xmlns="http://www.w3.org/1999/xhtml">
               <div style="width:100%;height:100%" id="moveArea">
                   <div style="position:absolute;top:20px;left:20px;height:40px;width:40px;background-color:green;border-radius:50%" id="myMovable"/>
                </div>
            </div>
        </foreignObject>
        <script type="text/ecmascript"><![CDATA[
webMI.addOnload(function(){
    var myMovableElement = document.getElementById("myMovable");
    var myMoveArea = document.getElementById("moveArea");
    var myMovableElementCenter = 20;

    webMI.addEvent("moveArea","mousemove",function(e){
        var myMoveAreaOffsetLeft = webMI.gfx.getAbsoluteOffset("left", true, myMoveArea);
        var myMoveAreaOffsetTop = webMI.gfx.getAbsoluteOffset("top", true, myMoveArea);
        var point = webMI.gfx.scaleEventCoordinates(myMoveArea, e.clientX, e.clientY, true);

        myMovableElement.style.left = (point.x - myMoveAreaOffsetLeft - myMovableElementCenter) + "px";
        myMovableElement.style.top = (point.y - myMoveAreaOffsetTop - myMovableElementCenter) + "px";
    });
});]]></script>
</svg>
By calling the "scaleEventCoordinates" method, the passed coordinates are converted (scaled) onto the "moveArea"-element and with the help of "getAbsoluteOffset", the "real" offset of the current HTML element (relative to the HTML body) can be subtracted.
Coordinate correction using setScaledEvents
The usage of the "setScaledEvents" method is intended for external libraries that access event coordinates. Anyway, it is also possible to use it for your own display code:
<?xml version='1.0' encoding='UTF-8' standalone='no'?>
<svg height="680" xmlns:atv="http://webmi.atvise.com/2007/svgext" xmlns="http://www.w3.org/2000/svg" width="1280" version="1.2" xmlns:xlink="http://www.w3.org/1999/xlink">
    <defs/>
    <metadata>
        <atv:gridconfig enabled="false" gridstyle="lines" height="20" width="20"/>
        <atv:snapconfig enabled="false" height="10" width="10"/>
    </metadata>
    <foreignObject height="680" y="0" x="0" width="1280" id="id_0">
        <div style="width:100%;height:100%" xmlns="http://www.w3.org/1999/xhtml">
            <div style="width:100%;height:100%" id="moveArea">
                <div style="position:absolute;top:20px;left:20px;height:40px;width:40px;background- color:green;border-radius:50%" id="myMovable"/>
            </div>
        </div>
    </foreignObject>
    <script type="text/ecmascript"><![CDATA[
webMI.addOnload(function(){
    var myMovableElement = document.getElementById("myMovable");
    var myMoveArea = document.getElementById("moveArea");
    var myMovableElementCenter = 20;
    webMI.gfx.setScaledEvents(myMoveArea);

    webMI.addEvent("moveArea","mousemove",function(e){
        var myMoveAreaOffsetLeft = webMI.gfx.getAbsoluteOffset("left", true, myMoveArea);
        var myMoveAreaOffsetTop = webMI.gfx.getAbsoluteOffset("top", true, myMoveArea);

        myMovableElement.style.left = (e.clientX - myMoveAreaOffsetLeft - myMovableElementCenter) + "px";
        myMovableElement.style.top = (e.clientY - myMoveAreaOffsetTop - myMovableElementCenter) + "px";
    });
});]]></script>
</svg>
Would we deal with an external library here, the eventlistener for the "mousemove" event would be processed within that external library. In this case we are calling "getAbsoluteOffset" to get the correct offset, also under different scaling conditions. Would an external library calculate this offset by adding up offsets of every parent element, then the parameter "useUnScaledOffset" could be used to compensate this behavior, as it does not respect scaling factors. It can also be necessary to alter the invocation of the "getBoundingClientRect" method, to use the webMI equivalent instead.
Coordinate correction using getAbsoluteScaleFactor
Should it be necessary to correct event-coordinates on your own, you can do this as follows:
<?xml version='1.0' encoding='UTF-8' standalone='no'?>
<svg height="680" xmlns:atv="http://webmi.atvise.com/2007/svgext" xmlns="http://www.w3.org/2000/svg" width="1280" version="1.2" xmlns:xlink="http://www.w3.org/1999/xlink">
    <defs/>
    <metadata>
        <atv:gridconfig enabled="false" gridstyle="lines" height="20" width="20"/>
        <atv:snapconfig enabled="false" height="10" width="10"/>
    </metadata>
    <foreignObject height="680" y="0" x="0" width="1280" id="id_0">
        <div style="width:100%;height:100%" xmlns="http://www.w3.org/1999/xhtml">
            <div style="width:100%;height:100%" id="moveArea">
                <div style="position:absolute;top:20px;left:20px;height:40px;width:40px;background-color:green;border-radius:50%" id="myMovable"/>
            </div>
        </div>
    </foreignObject>
    <script type="text/ecmascript"><![CDATA[
webMI.addOnload(function(){
    var myMovableElement = document.getElementById("myMovable");
    var myMoveArea = document.getElementById("moveArea");
    var myMovableElementCenter = 20;

    webMI.addEvent("moveArea","mousemove",function(e){
        var myMoveAreaOffsetLeft = webMI.gfx.getAbsoluteOffset("left", true, myMoveArea);
        var myMoveAreaOffsetTop = webMI.gfx.getAbsoluteOffset("top", true, myMoveArea);
        var reverseScaleFactor = 1/webMI.gfx.getAbsoluteScaleFactor(true, myMoveArea);

        myMovableElement.style.left = ((e.pageX - myMoveAreaOffsetLeft) * reverseScaleFactor -  myMovableElementCenter) + "px";
        myMovableElement.style.top =  ((e.pageY - myMoveAreaOffsetTop) * reverseScaleFactor -  myMovableElementCenter) + "px";
    });
});]]></script>
</svg>
By the invocation of the "getAbsoluteScaleFactor" method, the absolute (multiplicated) scaling factor gets returned and therefore it is possible to convert the coordinates pageX and pageY with the help of "getAbsoluteOffset".
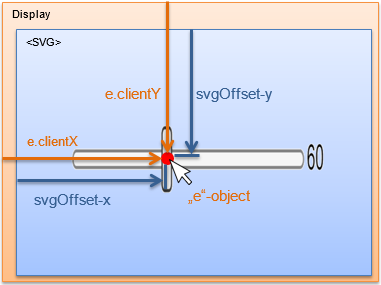
Relation between SVG- und viewport coordindates
In web technology there is a general difference of coordinates within an SVG element (user coordinates) and the coordinates that are relative to the browser window, the viewport coordinates:

Viewport coordinates (DOC) and user coordinates (SVG)
The relation of the two different coordinate systems is defined through an object (matrix), which can be retrieved in JavaScript by calling the getScreenCTM method. The webMI library provides the extended method webMI.gfx.getScreenCTM() to cover atvise specific use cases.
getScreenCTM()
A simple use case is a slider, that is projected as an SVG element within a display:
webMI.addEvent("mySliderKnob", "mousemove", function(e) {
    var p = webMI.gfx.createPoint(e.clientX, e.clientY)
        .matrixTransform(webMI.gfx.getScreenCTM().inverse());

    //p.x, p.y -> move slider-knob accordingly
});
getScreenCTM(true)
The "true"-parameter makes sense in combination with a foreignobject element, which represents a drop-down-list. This drop-down-list should be positioned in the HTML element "#mainContainer". Point of origin for the calculation is a fixed point within the SVG coordinate system of the display:
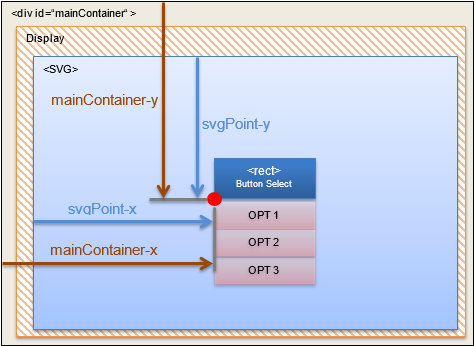
To be able to show the drop-down-list at the correct position, the SVG offsets must be multiplied with any scaling factors. This behavior can be reached by the usage of the parameter "true".
var p = webMI.gfx.createPoint(svgPointX, svgPointY);

//transform up to #mainContainer - consider scalefactors
p = p.matrixTransform(webMI.gfx.getScreenCTM(true));

webMI.display.showPopup(p.x, p.y, menuObj);
getScreenCTM("subDisplayID")
Usually the webMI method "getScreenCTM" always returns the corresponding matrix of the respective context. This means, when the call of the method is projected in the display code, the matrix is always calculated in the context of the display on which the call was actually projected in. Even if the respective display is displayed within a different display as "sub-display":
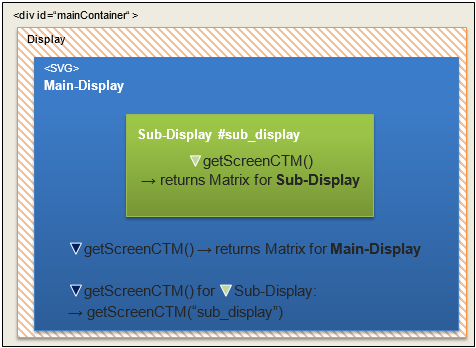
In order to read the matrix for the sub-display from the display code of the main-display, the method must be called with the #ID of the sub-display.
var matrix = webMI.gfx.getScreenCTM("sub_display");
getScreenCTM("foreignObjectID")
If the ID of a foreignobject is passed, the returned matrix can be used to transform coordinates that originate from an event of a foreignobject into coordinates for the SVG element of a display:
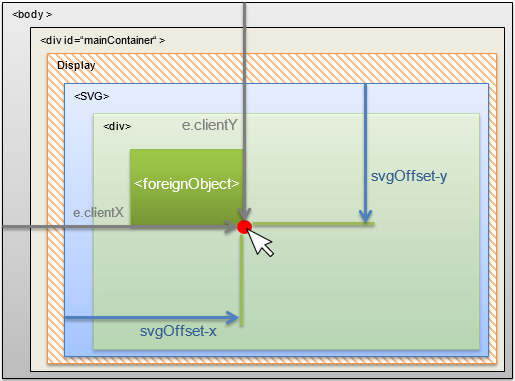
//e.clientX/Y: HTML-Body-Coordinates
var offset = webMI.gfx.createPoint(e.clientX, e.clientY)
    .matrixTransform(
        //transform into SVG-part of display
        webMI.gfx.getScreenCTM("foreignObjectID").inverse()
    );
//-> offset: SVG-Coordinates
Hint
If corrected coordinates are requested using webMI.gfx.setScaledEvents(), the clientX and clientY values of the "atviseOriginalEvent" must be used.