9 Adding alarms
9.1 Adding an alarm configuration
In this section, we will configure the internal malfunction alarm of our light object.
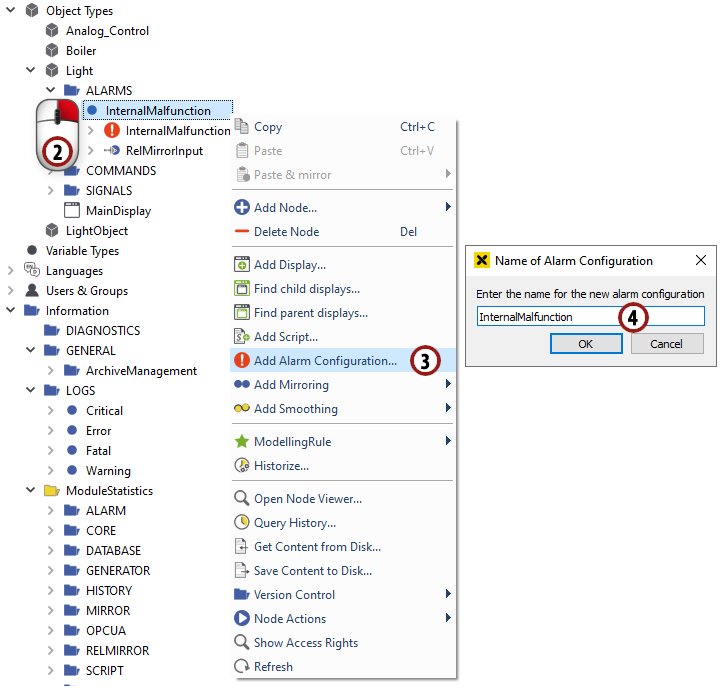
Open the object types list by clicking on the "Object Types" tab on the left side of the atvise builder interface.
Right-click on the "Light -> ALARMS" -> InternalMalfunction" data variable.
Choose "Add AlarmConfiguration" from the menu which appears.
Type in a name for the alarm configuration, for our example let's choose "LightMalfunction". Apply the name by clicking the "OK" button.
The "LightMalfunction" node will be added under the data variable; double-click it to open the alarm configuration interface.
At first, select the "OfficeLight" display using the
 button.
Now we must define a condition. Type in "light malfunction" as the "Condition Name" and "Warning: lights went down!" in the "To Active Text" field. Then enter "true" in the "Value" field and make sure "match" is chosen from the drop-down box.
Accept the changes in the alarm configuration by clicking
 . Now the alarm will be triggered when the value of "InternalMalfunction" is set to "true".

Adding an alarm configuration to the "InternalMalfunction" data variable.
Hint
After applying the dialog to the object type, the alarm is configured for all object instances.
9.2 Displaying the alarm in the object display
The alarm is already working. In this section, we also want to display the state of the alarm in the object display.
9.2.1 Adding a border to the object display which signalizes the alarm
Open the object display by double-clicking on the "Object Types - > Light -> MainDisplay" node.
Draw a rectangle around the object display.
Select "None" in the fill tab.
Choose a bigger line width and a red color in the "Stroke" tab.

Drawing a red border around the object
9.2.2 Add a dynamization to the border
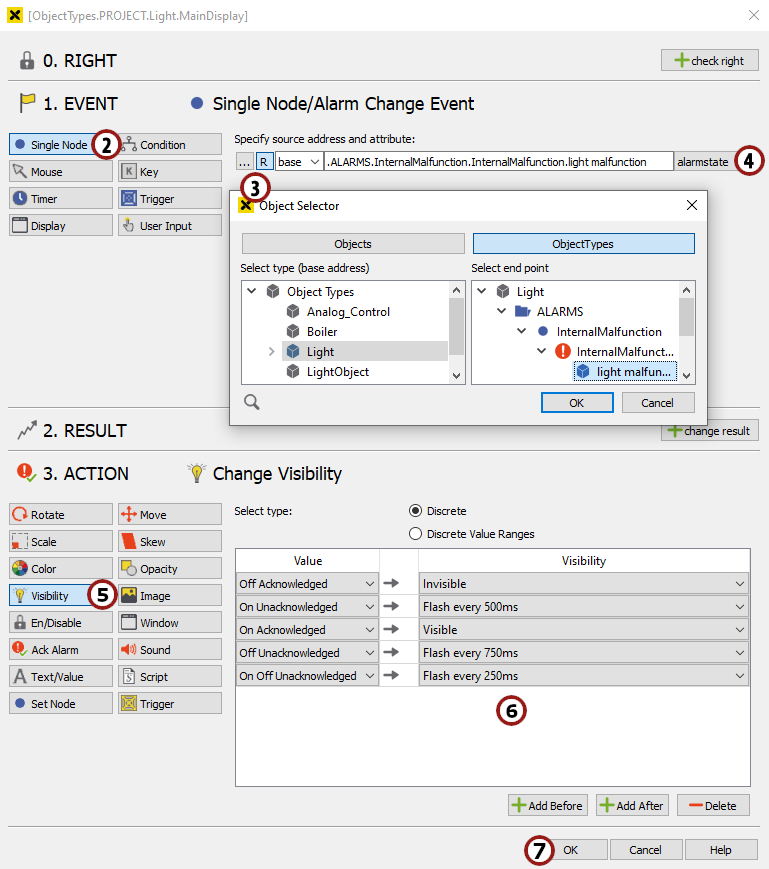
Make sure that the border is marked and start the "Simple Dynamics" dialog by right-clicking.
Choose
 from the possibilities on the left side of the EVENT part.
Select the ".ALARMS.InternalMalfunction.Malfunction.light malfunction" condition relatively as described in section 7.3.1.
The combobox should be automatically set to "alarmstate".
We want to change the visibility of the border in dependence on the alarm state, so we choose
 from the possibilities on the left side of the ACTION section.
Basically, there are five alarm states:
Off, Acknowledged (the red border should be invisible)
On, Unacknowledged (the red border should blink quickly)
On, Acknowledged (the red border should be visible)
Off, Unacknowledged (the red border should blink slowly)
On Off, Unacknowledged (the red border should blink very quickly)
Click the
 button button four times and enter the values as determined in the list above.
Apply the dialog by clicking "OK" and save the object display afterwards.
The "Simple Dynamics" dialog to display the state of the InternalMalfunction alarm
9.3 Viewing the alarm states in the visualization
Browse to "My Server -> OBJECTS" in the left part of the atvise builder and activate an "InternalMalfunction" alarm for one of the five OfficeLight objects by changing the value of the data variable to "true".
Load the "Office_Light" display in the visualization and see how the alarm state is displayed in the object.
Deactivate the alarm by changing the value of the data variable to "false".
Go back to the visualization and click on the alarm list symbol
 in the control panel to view a list of all active and/or unacknowledged alarms.
Acknowledge the inactive alarm in the list by clicking on "ACKNOWLEDGE".
Activate, deactivate and acknowledge the alarm several times to become familiar with the five alarm states.

Open the alarm list to acknowledge an alarm